

Each year I like to try one or two (or ten) new varieties in my garden that I’ve never grown before. In doing so, I keep the garden new and exciting year to year and have the opportunity to learn about growing different plants. One of the latest additions to the garden this season was ginger. Now, I know what you’re thinking. Ginger is considered hardy in zones 9-12, growing best in warm, humid conditions, so there is no way you can grow that in a zone 5 garden. That’s what I thought, too, until I found out I was wrong.

My ginger growing adventure started when I read an email from Fruition Seeds, a seed company in the Finger Lakes region of western New York (incidentally also zone 5) that specializes in organic, regionally adapted seeds. They like to push the envelope and experiment with growing and developing varieties that traditionally wouldn’t grow in our northern climates. They have become quite successful with this venture and love to share their adapted seeds and knowledge with home gardeners. So when I saw that they were offering organic ginger rhizomes and an online ginger growing masterclass, I was ready to give ginger growing a try.

My ginger rhizomes arrived in mid-March and, armed with the knowledge and notes I accumulated from the class; I was ready to dive in. The first step was to divide the rhizomes for planting. I had learned that each piece needed to be a minimum of three inches in length and contain at least three eyes (buds). I meticulously counted eyes and measured length, cutting along the way, trying to make the smallest cuts possible so that the rhizomes would quickly heal. In between each slice, I cleaned my knife in isopropyl alcohol to avoid the possibility of spreading any disease.


After the pieces were cut, I spread them out to heal over the next week. During that time, I observed to make sure they healed properly. Once the cuts had scabbed entirely, they were ready for planting. To pre-sprout them, I planted them in a shallow tray about one inch deep in pre-moistened potting soil, ensuring that none of the pieces were touching—this process needed to be done at least four weeks before our last frost date. In the ginger masterclass, I learned that it is imperative not to overwater, or the rhizomes can start to rot. And because ginger loves a warm environment, the tray needed to be set on a heat mat.


The next thing I learned about ginger is that growing it is an exercise in patience. It is slow-growing, and it seemed to take a very long time for it to sprout. Weeks of staring at plain potting soil had me questioning whether I had failed. I became convinced that I had overwatered, rotted the rhizomes, or didn’t have the environment warm enough. I would check for sprouts frequently, each time leaving in disappointment. The saying “A watched pot never boils” ran through my head as I vowed to change the phrase to “A watched ginger rhizome never sprouts.”
And then one day it happened! One green sprout, and then two, and then three erupted out of the potting soil. I was elated! I hadn’t killed my ginger; it was alive and well after all. Once the rhizomes had sprouted, it was time to transplant them into larger pots, put them under grow lights, and coddle them until it was time to plant them out into the garden. That time came in late May when temperatures became consistent, and after hardening them off, I planted my ginger babies into their new home in the garden.


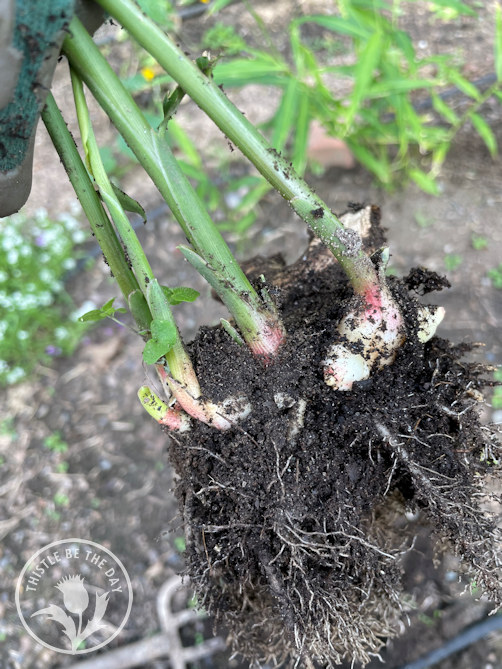
Next came more practice in patience, months of weeding, watering, fertilizing, occasional hilling to keep the rhizomes covered, and watching my ginger grow. Finally, in early October, with the threat of frost looming, it was time to harvest my ginger. With excitement and a bit of nervousness, I plunged my pitchfork into the soil and sprung one of the ginger rhizomes up from its earthy home. Would I be rewarded with beautiful, fresh ginger? Or would this entire ginger-growing adventure conclude in disappointment and failure?


“Yippee!” I exclaimed as I unearthed my first ginger rhizome. Finally, I had done it; I had succeeded in growing ginger in my zone 5 garden! It may not have looked quite as large as what they grow on the farm, but it was gorgeous to me. I dug up rhizome after plump rhizome, brimming with new growth. My confidence and pride were swelling with each harvested pitchfork full.

Once all of my ginger was harvested, I cleaned any remaining soil off, revealing the true beauty of the harvest-each fresh ginger rhizome, a beautiful golden hue tinged with pink. When they had all been thoroughly cleaned, cut into smaller pieces, and allowed to dry, they were ready for storage. I saved a few pieces in the refrigerator for fresh eating and sealed the rest in an airtight container in the freezer, prepared for future enjoyment.


In the end, I am delighted with my ginger growing experiment. I learned a lot along the way and had the excitement of producing a new crop. I also learned that there is no comparison to the taste of the freshest ginger I’ve ever eaten. Will I ever grow ginger in the garden again? I haven’t decided yet. It was a lot of work and took a long time to get results. But, you never know, when my ginger stores in the freezer have depleted, I might get the yearning to give it another go. Until then, I will be enjoying the literal fruits (or rhizomes) or my labor.


Wow, that’s so awesome! I can tell how much fresher your crop of ginger is, versus the ones you used for cuttings. That would make some scrumptious ginger-honey tea😁
LikeLiked by 1 person
Thank you, LiziRose! Mmm, I love your tea idea; that sounds like the perfect way to welcome fall.
LikeLiked by 1 person
Whatever you make, it will be delicious with home grown ginger!
LikeLiked by 1 person
I completely agree! 🙂
LikeLiked by 1 person
I’m wondering if the fact that you let the ginger roots dry for a week to “heal” delayed their progress. I routinely put ginger in an indoor pot – simply slice off a 2-3” piece of a root I bought in an organic market that is still fresh…(I.e., has been kept cold!) and pot it with the eyes right at the surface… I usually have a sprouting plant with a number of stalks within a couple of weeks and a full plant within the month. I move the pot outdoors in the summer and then back in when it gets cool, slicing off a piece of the root whenever I need some for a recipe. I never harvest the whole root… and my plants have been thriving – and providing me with fresh ginger – perennially for years with no maintenance other than watering. No where near as labor intensive as your “experimental” method and always a supply of fresh ginger in hand!
LikeLiked by 1 person
Thank you, Peggy, for sharing your method of growing ginger! We learned to let the cuts heal to help prevent disease, but I’m glad this alternative method works for you. I will have to give it a try in the future.
LikeLike
I’ll have to try that in Tennessee, I ♥️ Ginger Bread 🙂 (I’m scared of 𝔾𝕚𝕟𝕘𝕖𝕣𝕓𝕣𝕖𝕒𝕕 𝕄𝕖𝕟 on Halloween though 🎃 😉
LikeLiked by 1 person
Yes, give ginger growing a try! I’m sure you’ll be making many loaves of gingerbread in no time!
LikeLike